Monday, December 14, 2015

LNA for all - Low Noise Amplifier for many applications from 28 MHz to 2500 MHz

Are you looking for the cheap multipurpose preamplifier? HAM radio, DVB-T, ATV, SETI, ADB-S, Air traffic and many more applications all in one PCB, "turn the key" solution.


Low noise and low price amplifier that can find his place in many applications is ready. When I said low noise I mean the noise figure that is lower or equal to 1dB over all range. The LNA is covering all bands starting from HF up to the SHF. Wide band gain coverage starting from 28 MHz and extending up to 2500 MHz. One LNA for all frequencies and more. This small gadget can lower and improve you DVB-T SDR stick noise figure and improve the sensitivity. Adding the LNA in front the front end of your receiver can open another dimension in your reception. Receiving HAM radio satellites should not be a problem even with the small setup and portable antennas.


The amplifier is built around Mini-Circuits PSA4-5043+ E-PHEMT Ultra Low noise MMIC amplifier operating from 50 MHz to 4 GHz. Small SOT-343 package combine low noise and high IP3 performance with internal match to 50 ohms. Manufacturer declare a 0.75dB NF @ 1 GHz and 0.98dB NF @ 2 GHz with IP3 value reaching 33.5dBm. Beside the LNA purpose the same component can be used as a small driver amplifier capable of delivering +21dBm of output signal thanks to high P1dB value. The last but very handy feature is Class 1B ESD protection incorporated on die making this device easy for handling.


Even the price is very popular the performance of the LNA4ALL can be compared with the really expensive LNA in range on the market. We made a several independent lab measurements just to prove the quality of the product and thanks to all this guys we do have some relevant figures. One of the measurements is the TOI (Third-order intercept point) or widely known IP3 done by Thomas, DG1TRF. The TOI/IP3 graph was derived from the automatic measurements sweeping the range from 10 MHz to 3.5 GHz in 10 Mhz steps. The average TOI/IP3 is 34.75 dBm over the range.


The above graph was derived from the single measurements like the one bellow on the 1296 Mhz. Following the markers it is easy to calculate the TOI/IP3 but even easier if you have the machine showing all the results for you.


 Thanks to Joost from the Netherlands we do have the latest batch S parameters measurement. As can be noticed, the S1,1 is not good at the lower frequencies but for that we do have the LNA4HF designed for the lower bands.

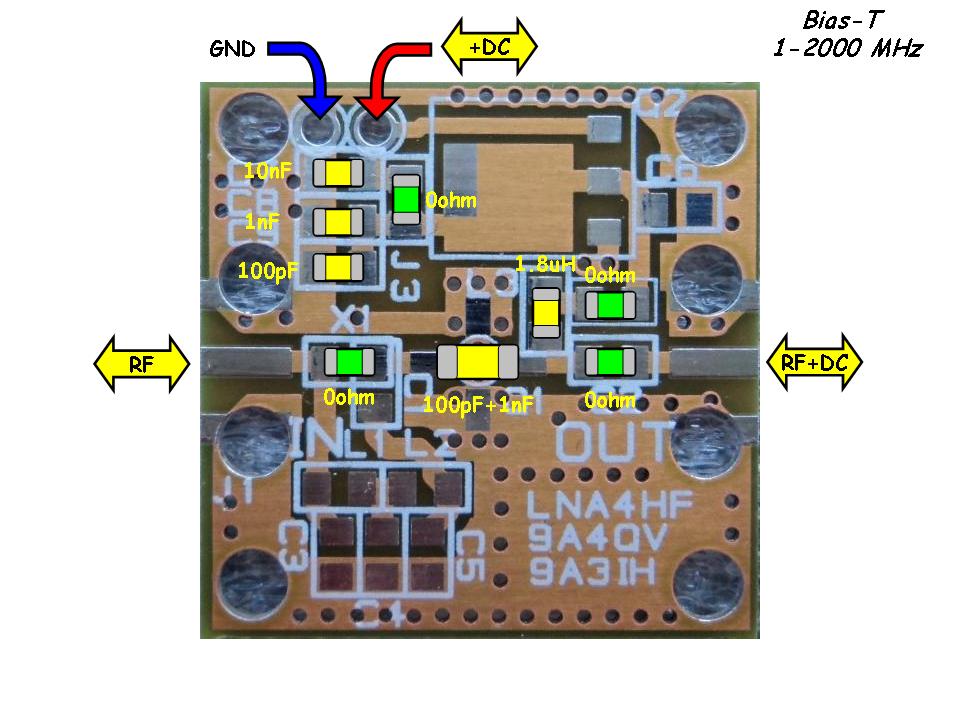
The LNA is made on professionally made printed circuit board measuring 25x25 mm that can be used also for the other active components using the same SOT-343 package and pin out. There is enough place to combine the input and output matching components on the same board, as well as the bias resistors and various bias configuration. The 500mA 5V voltage regulator is integrated on the board where any voltage from 6 V to 9 V DC can be used for the supply. The consumption is between 55 mA and 65 mA.


Turn the key solution is delivered with the standard female SMA connectors insuring stable operation over all range of frequencies. Experience users and builders may prefer the version without SMA connectors in order to house the LNA into the proper aluminum milled box or other metal housing. We predict also this scenario ensuring the 3 mm dia. holes for tight connection. The ground loops and not a proper grounding is a common mistake among the home brewers all leading to unstable LNA operation and self-oscillations. If you plan to use the LNA this way we prepare also the holes close to the SMA connectors as well to overcome possible problems.


If you already experience the quality of our ideas upconverter up-100 then you know what we are talking about. Enjoy your radio !

BASIC SETUP

The basic setup, what you get when you buy the LNA4ALL is presented on the next slide. The LNA4ALL tested and checked, ready for 6-9 V DC supply. The latest PCBs are "gold" color and the 5V voltage regulator is AMS1117-5V0 instead of the very first version where the 78M05 was used. C10 capacitor is also fitted despite the fact that this is the part required for the optional through the coax power supply.


MODIFICATIONS (not included in the basic setup order)

5V DC modification
The most asked modification is a 5 V DC supply possibility. It is very easy to do that just by adding the 0 ohm 0805 SMD size bridge or just a peace of wire on the place marked J3 on the PCB (green colored SMD component on the next slide). Using the same power leads you can power the LNA4ALL now with the 5V DC. We do not supply extra parts for modifications any more.

12V to 13.8V DC modification
Next most common modification is possibility to supply the LNA4ALL from the 12V to 13.8V DC power supply. The voltage regulator on board should meet this request, but it is much safer to run the LNA through the simple 100 ohms resistor in series with the positive power lead. You should rate the resistor power based on the fact that the LNA consumption is 60 mA. 1 watt resistor should do the job as per next slide.

Bias-T supply modification
One of the feature requested from the users was the so called "phantom power supply" through the bias-T configuration. To supply the LNA4ALL with the DC power through the coaxial cable from the receiver or bias-T close to the receiver just a simple add-on is required. The 10uH SMD 0805 size inductor should be placed on the place marked L2 close to the OUT  SMA connector. The PCB can accommodate also 0603 and 1006 SMD standard inductor. (Green color on the next slide). The power should be anything from 6-9V DC. If you want to use the 12V - 13.6V supply use the 100 ohms resistor in series with your Bias-T unit close to the receiver side. We do not supply any more the 10uH inductor nor the bias-T unit.

Bias-T 5V DC modification
And what if you have available only 5V DC on the antenna port of your receiver. (I think the FunCube Dongle have this option, or not ??) In that case, the same modification from the previous slide is required (10uH inductor on the place L2) plus the 0 ohm 0805 SMD size resistor or a wire bridge on the place marked J3. Now you can power your LNA4ALL with the 5V through the coaxial cable.


ESD static protection modification
Another very common question is how to protect the LNA from the statics coming from the antenna. We do receive some letters indicating the problem where the MMIC is damaged due to statics or corona discharge effect on the antenna constantly connected to the LNA. So how to protect the LNA? The best way is to disconnect the antenna and before connecting the same back, properly ground and discharge the antenna.
This can not be always possible and handy so the only protection that is used widely is to bridge the input antenna with the BAV99 antiparalel pair of diodes like on the next slide. This may save your LNA but not from the direct thunder hit :-)
The solder mask should be scratched off and the BAV99 diode soldered (green on the next slide) on the antenna input. Using the antiparalel diodes will degrade NF and S11 a bit and there is a treat of the intermodulation products created on the diodes if the strong broadcast signals are present on the antenna. So beware of this facts.


HackRF modification
After a couple of queries how to pair the LNA4ALL with the HackRF here is the simple explanation to make the life easier for the user.

There is the phantom power (3.3V & 50mA) option on the HackRF antenna port, software control. This can be used to power the LNA4ALL just in the RX mode. You can not transmit through the LNA4ALL using this modification.
The LNA4ALL can operate also on 3.3V where the consumption is cca. 35mA. All you need to do is to insert the 10uH SMD coil and 0 ohm SMD bridge (or just a piece of wire) on the green marked components and you can use the benefit of the HackRF phantom power.
The performance of the LNA4ALL remain almost the same, just the IP3 is a bit lower, but also the NF is a bit better resulting the lower consumption of 35mA comparing to 60mA when 5V is used.

Important note:
If the LNA4ALL is damaged (usually with the static) it can draw more than 250mA, in some cases even maximum current that the supply can deliver. To protect the AirSPY, HackRF, USB ports or other devices from excessive current instead of 0 ohm required for the modification the SMD 0805 size resettable fuse 100mA or 160mA should be used. In this case no damage should occur on the slave equipment used.


HackRF TX amplifier modification
Note: First of all, you should be aware that transmitting without licence may get you in trouble. Also, transmitting with higher power level then allowed may get you in trouble but you can get others in trouble too. Consult the local law and rules before transmitting !

This is a DIY project, do not ask me to make the HackRF TX amp. modification for you.

With this modification you can amplify your transmitted HackRF signal to over 100mW (+21dBm) and at the same time use the HackRF Bias-T for DC power supplying the same amplifier. To enable this feature you will need to insert the 10uH or 8.2uH SMD coil (green marked component on the picture) on the IN side of the LNA4ALL. This is the same coil (marked L2) that is used for enabling the Bias-T RX mode. As there is no pads on the input side of the PCB the coil should be flipped up side down so the contacts can be soldered using a magnet wire to the input capacitor C4 and the other side to the C9 as per picture. Keep the wire leads as short as possible to avoid oscillations. Connect the IN port to the HackRF antenna connector and LNA4ALL OUT port to the antenna. Enable HackRF Bias-t and depending the HackRF output level the LNA4ALL output can reach over 160mW. Usual power level required for that power is 0dBm up to 500MHz. As you go up with the frequency you need to increase the drive to get the +21dBm output. Do not go over +10dBm (10mW) at 2.4GHz. The consumption is the same as in RX mode, max 60mA @ 5V DC.

Note: 160mW seems like a low power, but using directional antennas and high frequency with the clear line of sight the distances of 200km to 300km can be reach without a problem. 


AirSPY modification
As the AirSPY hit the market many users are asking is it possible to pair the LNA4ALL and the AirSPY using the Bias-T feature on board the AirSPY. I did not found the specs. about the maximum current that the AirSPY can provide through the Bias-T just the voltage, 4.5V DC. Some of the users advice that there is 250mA voltage regulator on board for the Bias-T but the the manufacturer point the 50mA as the maximum current, on various forums.

If the Bias-T can provide the 4.5V and 50mA then the LNA4ALL can be used with the following modification. It is the same modification required for the HackRF, no difference.The LNA4ALL can operate also on 4.5V where the consumption is cca. 47mA. All you need to do is to insert the 10uH SMD coil and 0 ohm SMD bridge (or just a piece of wire) on the green marked components and you can use the benefit of the AirSPY phantom power.
The performance of the LNA4ALL remain almost the same, just the IP3 is a bit lower, but also the NF is a bit better resulting the lower consumption of 47mA comparing to 60mA when 5V is used.

Important note:
If the LNA4ALL is damaged (usually with the static) it can draw more than 250mA, in some cases even maximum current that the supply can deliver. To protect the AirSPY, HackRF, USB ports or other devices from excessive current instead of 0 ohm required for the modification the SMD 0805 size resettable fuse 100mA or 160mA should be used. In this case no damage should occur on the slave equipment used.
RTL.SDR dongle modification
Today we have many vendors producing their own dongles based on the RTL chipset. Each one offer something different, listening the market and modifying the dongles by the user requests. One of many that offer some handy add-ons is the RTL.SDR type dongle. Beside the nice aluminum housing and improved cooling the dongle offer the Bias-T feature. Enabling the Bias-T, the dongle will deliver the 5V DC to the SMA antenna input connector protected from the high current by ressetable fuse. Nice feature not seen on the other dongles.

To supply the LNA4ALL using the mentioned RTL.SDR feature you need to do is to insert the 10uH SMD coil and 0 ohm SMD bridge (or just a piece of wire) on the green marked components. The performance of the LNA4ALL should remain the same. At 5V provided by the dongle, the LNA4ALL will draw 60mA.


Sunday, December 13, 2015

2x LNA4ALL for the Hydrogen line measurements

The LNA4ALL is a wide band LNA that cover also the Hydrogen line, 1420 MHz frequency. I receive a lot of e-mails from the guys asking for the performance of the LNA4ALL at the 1420 MHz with idea to use two LNA4ALL in series configuration to achieve the higher overall gain. The H-line guys main concern was Noise Figure and then the Gain. The feedback from the H-guys was evaluated  where we found the mixed experience. Some of them were happy with the setup, some of them admit that the LNA4ALL is good for the second stage LNA only and we have guys without instant success and the proper results due to various technically related problems deserving the completely separate new post. I will try to explain what is the value you get  for the money invested.


I already mention that the LNA4ALL is a wide band amplifier. Designing the amplifier the main goal was to end up with the unconditional stability where we count that the users may forget to connect the input/output, may short the input or output or may have all kind of mismatch situation. The LNA4ALL should handle all this situation and not run into oscillations nor fail to operate or damage the attached equipment.
The second goal was to get the low Noise Figure and the maximum possible Gain that the active device can deliver on such a wide range of frequencies. At the same time we aim to the high IP3 numbers where the LNA4ALL will not run easily into non-linearity and make more damage to the receiver chain than not running the LNA at all. The LNA current consumption was evaluated and this became also one of the limiting factors.


The simple question was, can LNA4ALL compete against the LNAs designed only to operate on 1420Mhz ? The even simpler answer is NO, it can not. The main difference is that such designed LNA should have a lower NF (0.2-0.4 dB), stability around 1420 MHz (at least), and a higher Gain (35-40 dB). Most of the LNAs that are targeting the H-line operation are within the mentioned specifications. The only drawback may be the price. They are made as plug&play units and the user does not have nothing to "tune" and play around the hardware. If they are damaged, the user must be highly skilled to repair it and tune it for the best performance.

Comparing to the above mentioned LNAs the LNA4ALL will deliver slightly weaker performance and it is on you to decide whether it will suit your needs or not. Some of our H-line users have the access to a really nice, and the most important, calibrated measuring equipment. I will share with you their measurements so you can evaluate the LNA4ALL for the H-line operation. The setup used was the two LNA4ALL connected in series with the side pads separated power supply. The first measurement was the S2,1 (Gain) measurement performed on the network analyzer. Gain of 2x LNA4ALL @ 1420 Mhz was 31.35 dB. Of course, using the only one LNA4ALL the gain will be half of that.


The second measurement was performed using the Noise figure meter and the 14dB ENR noise source head. Noise figure measured @ 1420 Mhz for the 2x LNA4ALL in series configuration was 0.698 dB and the gain of 31.9 dB. The peak in the NF graph around 1.7GHz was due to the power supply used. In the later measurements with the other power supply used the peak was gone.


The 14dB ENR noise head used in the second measurement is "universal" noise source where the  low noise, and the high noise devices can be measured. This head suits perfectly for the mixer noise figure measurements. I ask the guys if they have the possibility to repeat the same test but with the lower ENR noise source to get more accurate (higher NF) results. They reply with the following graph. The noise figure of the 2x LNA4ALL in series was 0.757 dB and the gain of 32.2 dB @ 1420 MHz. You can note that the peak around 1.7 Ghz at the NF graph was gone.


Note:
All measurements were performed using the 2x LNA4ALL without milled housings, just the bare boards with the SMA connectors attached.

Saturday, December 12, 2015

LNA + DVB-T dongle for dummies


I fell like I have to write a couple of lines regarding the setup where the popular RTL dongles are used together with the external LNA to improve the reception, despite the fact that this was already explained many times and the radio signals theory can be found on the web, books, white papers etc.

The most common question that can be found through the various posts on the forums is:

I add the LNA but my reception is not improving, more over it is even worst then without the LNA ! What is wrong !?

To make a long story short I can use the old classic children approach where the stork always bring the baby. In our situation we can say, just use the LNA and do not ask further, it will work better then without it.

As we grew up we are not buying the stork and the baby stories any more so here I will try to elaborate as simple as possible what is going on when the LNA is connected just between the antenna and the RTL dongle, or any other receiver. I will try to make the things really simple not using the fancy NASA language and just one formula, but hey, no calculation at all.

Just to mention, what you already know, the LNA stands for the Low Noise Amplifier. So the first question that may arose is how much low is low enough for the LNA, where is limit when the LNA is not any more the low noise amplifier but rather a signal amplifier ? Is this number 1, 2, 3 or 5dB ? Well, this is a kind of who's first, egg or chicken question. But to simplify, if you have the receiver that has the NF 10dB, any amplifier that has the lower NF than 10dB (let say 5dB) will be a low noise amplifier for that receiver. The NF stands for Noise Figure and this will be explained soon.

On the Picture 1. we can see the standard signal shape on the well known SDR# screen. We can clearly distinguish the signal from the noise. We can read on the side axis the level represented in dB for the each, the noise floor and for the signal. Simply, the difference between this two values will give us the signal to noise ratio, SNR or S/N. This is a measure of signal strength relative to background noise. Of course, we want to have this ratio as higher as possible.


If you look now the Picture 2. you will barely notice any difference comparing to the Picture 1. Most of you will think that this is wrongly posted picture or the same as the first one. Looking carefully you can notice that the signal on Picture 2. is a bit higher, stronger than the first one, exactly for 3dB. So “only” 3dB which can be barely seen on the screen ? The S/N in this case is improved for 3dB. This improvement sometimes make a difference in decoding the signals from not decoding the signals at all.


Increasing the S/N for “only” 3dB may be done “simply” by increasing the transmitter power by other party for double, so let say you are listening some FM broadcast station and to have this small increase on your screen the guy need to double the power from 1 kilowatt to 2 kilowatts.

Or, you can increase the gain of the antenna, if you are using one yagi antenna 2 meters long, roughly for 3 db you will have to use one 4m long, or pair another same size antenna with that existing one. Maybe you finally assemble you 8' dish, but for 3db increase you will have to look for another one 12' in diameter.

In terms of free space path loss the 3db gain may be obtained if the distance is shorter. Plain transmitting ADS-B on 1 GHz on 140km from the listener will increase the signal for 3db when closer, just on 100km from the same listener location.
It is obvious that all this measures are not possible, simple, nor cheap for the user armed with the 10$ DVB-T dongle acting as SDR receiver. What can be done fairly simply is to add the extra LNA. S/N can be increased by decreasing receiver contributed noise. What does it mean? It you simple decrease the overall system noise figure, the S/N will be increased, roughly for the same amount expressed in dB. So here is the place where we should explain terms like noise figure, noise factor and relationship with the S/N ratio.

The noise factor Fn of the system is the input S/N divided by the output S/N. Noise figure is then noise factor expressed in dB NF=10xlog(Fn). Sometimes it is convenient to express the noise as temperature (K), when using the antenna temperature Ta and the temperature of galactic sky background in the calculations but we will not go so deep in this guide.

It is important to say that once the signal is delivered from the antenna to the receiver, the S/N will deteriorate. This is why there is the saying that the best amplifier you can get is your antenna. We can not increase the S/N higher than one delivered from the antenna using analog techniques. Any LNA, even ultra low noise LNA will contribute with the internal noise degrading S/N ratio. So how the heck we can then improve the S/N at the end with the LNA?

The best way is to explain that with the practical example. Of course we will use our cheap 10$ DVB-T dongle. We can find different informations where the noise figure (NF) of the dongle is from 4dB up to 10dB. Let's stay in the middle and assume that the DVB-T NF is 7db, at the maximum gain, (the same stated from the Leif-SM5BSZ, and this is the guy we can trust). Higher up we mentioned that S/N can be increased by decreasing the receiver contributed noise. In this case the receiver contributed noise is 7dB. If we add the extra LNA with the noise figure NF=1db delivering 20dB of the gain the overall resulting noise figure will be now only 1.04dB which is receiver contributed noise. It is 6dB lower then without the LNA and roughly this is the amount that S/N will be improved. So adding the simple LNA we can improve the S/N ratio for 6dB. If you remember the earlier comparison where we use the 8' dish antenna, this will be equal as using the 16' diameter dish antenna, just by adding the LNA.

Not clear enough? Lets try to use the formula that I mentioned at the beginning. You do not need the calculator for this :-) The following formula determines the lowest signal that can be received by our receivers :

Smin = kT x B x Fn x S/Nmin

Smin – minimum signal
kT – Boltzman's constant
B – receiver noise bandwidth
Fn – noise factor
S/Nmin – minimum SNR required for the receiver to decode the signal

From all upper factors, the only one that is not a kind of constant is the noise factor. All the rest are constants. It should be clear enough that lowering the noise factor the level of the Smin is also lower, so simple. One can say, hey, but narrowing the bandwidth B we can also improve the minimum signal level. That is true, but this may be the material for another guides for dummies. Should I challenge somebody to write it ? Meantime, just check and compare the following two pictures. 


I use the weak signal from the signal generator and on the first picture the signal is clearly seen, some 5db over the noise. On the second picture there is no sign of any signal present. Same frequency, same signal level injected, same gain on the same E4000 tuner but different bandwidth – sample rate used.
So when you tune to the desired signal, use the minimum required bandwidth, you can improve your reception.

The final word that is spread all over the guide is that the purpose of the LNA in tandem with the DVB-T dongle is not amplifying the signal (as we have enough gain in the dongle) but rather lowering the noise figure, hence improving the signal to noise ratio.
So have fun with your cheap dongles....

Friday, December 11, 2015

LNA + DVB-T = FAQ


I get the LNA connected to the DVB-T dongle but the reception is bad, worst than without the LNA. The noise floor is really high comparing to the signal.

If you connect the LNA strait to the dongle with the SMA adapter the LNA picks up the noise from the dongle or the PC. Move the LNA few meters away and connect it with the dongle using the coaxial cable. Instead, you can use the shielded LNA in the proper metal housing.

Should I position the LNA close to the antenna ?

This should be always done if you aim for the weak signal reception on the VHF and up frequencies. Positioning the LNA close to the antenna will give us lower noise figure of the system and better reception. Other benefit is that after the LNA we can have a long run of cheap, not high quality coaxial cable to the dongle that will not spoil the overall system performance dramatically.

I've heard that I can power supply remotely my LNA using the Phantom power and Bias-T, is it true ?

The remote (close to the antenna) LNA may be power supplied using the coaxial cable, the same one that is delivering the signal from the LNA. If your dongle/receiver have the Phantom power option on antenna connector you can inject the DC into the coax. The LNA should be enabled for such operation.
If you do not have this option on the dongle nor on the LNA you may use so called Bias-T, one close to the receiver and the other close to the LNA. The function of the Bias-T is to inject the DC voltage on the receiver side and to extract the same DC voltage on the LNA side, isolating the RF leads (connectors) from the DC power.

Can I print the housing on my 3D printer ?

3D printers usually use the plastic materials. The ESD can build up on the plastic and damage the ESD sensitive device in the LNA. Using the plastic housings will not help shielding the LNA from the electromagnetic noise/sources. Not recommended.

I use the metal shield/box for the LNA but the reception is bad and the noise is very high!

You probably end up with the oscillator rather than the amplifier. The probable cause are ground loops created due to long antenna connector leads at the input or the output. The best way is to use already soldered connectors and run a small jumper coaxial cables to the shielding walls. The oscillations may occur also due to housing dimensions, creating the resonator at some higher frequencies.

My reception is still bad!

You may have the problem with the desensitization. Your receiver is overloaded by the strong blocker (radio transmitters) in or out of the band. Reduce the gain in the dongle manually. You may have to turn also the AGC off. Use the filter to filter out of the band blockers.

I bought the filter, should I put it before the LNA ?

Inserting the filter before the LNA (between the antenna and the LNA) will spoil the noise figure roughly for the filter insertion losses expressed in dB. So the S/N will also be degraded for the same figure.

I bought the filter, should I put it after the LNA ?

Inserting the filter after the LNA (between the LNA and the dongle) will leave the LNA widely opened to the strong signals. This may be fine if you have the high IP3 LNA.

OK, where should I insert the filter then ?

If you aim for the weak signals reception and you have the high IP3 LNA you need to install the filter after the LNA. If your LNA can not stand the strong blockers (broadcast TV, Radio, Cell towers) you need to protect it with the filter, otherwise the LNA may produce reach intermodulation products that may be spread all over the frequencies masking the other signals on the band. More over the result may be a bunch of phantom signals that are not existing on the bands.

I bought the SAW filter, any good ?

The saw filters are compromise, small and sharp filters but with the higher insertion losses (2db and up) than the other filters. They may be quite expensive too. Avoid positions between the antenna and the LNA for the SAW filters if you can. They are perfect solution for the post LNA filtering.

What does the high IP3 LNA mean?

IP3 stands for 3rd order intermodulation products. You want to have this number as high as possible. The LNA with the IP3 (OIP3) number higher the 30dBm is already considered the high IP3 LNA.

What figures I should look when buying the LNA ?

Depending the purpose where you want to use your LNA you may choose some characteristics better than the others but generally you are looking for a low NF (noise figure) number, high IP3 number, and the higher – the better gain number.

I do not see the IP3 figure declared, how can can estimate the IP3 performance ?

If you can find the P1dB figure, than as a rule of the thumb you may estimate the IP3 some 10-15dB higher than this value. If you read the P1dB of 20dBm, you may estimate the 30-35dBm IP3. The latest modern LNAs have even bigger difference then the mentioned 15dBm. High IP3 LNA draw much more current (50-120mA) for the single stage comparing to the low IP3 LNA where the consumption may be not higher than 10mA.

My LNA stop to work after the first storm, what is wrong ?

Depending on the antenna type used, the ESD may build up and damage the ESD sensitive parts in the LNA. The LNA should be repaired.

How can I protect the LNA from the ESD ?

The best protection is to disconnect the antenna from the LNA or any other device. This may not be simple if the LNA is close to the antenna. The most common solution is using a pair of anti-paralel diodes (BAV99). They can introduce the IMD products if the strong signals are present in the antenna.
Good protection is to use the antennas designed to have the DC grounded hot end antenna connector.
Another option is to use the shorted quarter wavelength long coaxial stub resonant on the frequency of the interest.

I would like to use cheap RG-6 coax from antenna to LNA

The RG-6 is 75 ohms coaxial cable widely used in TV/SAT and radio installations. The losses in the cable are 6.2dB for a length of 100ft (30 mtrs) at 1.000 Mhz so let say close to ADS-B frequency. 50Ft long run of the coax from the antenna to the LNA will introduce roughly 3dB loss in the signal or 50% loss of power.

My LNA has the impedance of 50 ohms and the RG-6 has the 75 ohms, will it work ?

It should work. The mismatch/SWR between the 50 and 75 ohm is 1:1.5, means reflected power of only 4%. In terms of dB, the losses are lower then 0.2dB due to mismatch. You can not see the difference in the reception for such a small loss. If you run the long run of the coax, the coax impedance mismatch losses are negligible comparing to the losses introduced by the coax itself.

I would like to use the F connectors on my setup

The F type connectors are designed for a 75 ohms coaxial cable, but they should work also with the same diameter 50 ohms cables. The losses are bit higher than the standard SMA, BNC or N type connectors but if you are not in the weak signal operation the connectors can perform good enough up to 1GHz range.

Thursday, December 10, 2015

DIY Bias-T


I am receiving more and more requests for the separate Bias-T unit that can be accompanied with the LNA4ALL. The LNA4ALL has the Bias-T powering option but if you do not have such a possibility on your receiver side you need to buy one or to build one. Hack-RF, FCD, AirSpy support the DC over the coaxial cable but the cheap DVB-T dongles are without such an option.


Bias-T is nothing more than a simple diplexer but sometimes simple things are not simple to design if you want to have a proper performance. The bias-T that we need should be quite broadband and this is not a trivial task. To make things as simple as possible the compromise is required. This project should be good enough for our needs. All the parts can be retrieved from an old hard disk drive, but if you are ordering a new one the shipping will be much more then the parts itself.  I use the "round" values that are most common.

Recently we introduce the ADS-B filter where on the same PCB the bias-T is integrated. If you want to use only the bias-T option without filter you can still use the PCB designed for the filter on the picture above. The parts placement and the SMD standard size components are clearly visible. Series capacitor 1206 size is created by parallel 100pf and 1nF capacitors.  Bias-T maximum frequency declared is 2 GHz. The Insertion Loss on the higher frequencies is not a problem and found to be low, but above 2 GHz frequencies the Return Loss start to fall bellow 10dB value and this may create some problems with the unit sensible to good matching and impedance. This is why we declare the operating range from 1-2000 MHz only. Find the Insertion losses related to the frequency in the following table.


The filter PCB only can be ordered following the link : ADS-B filter
If you prefer the DIY bias-T older design here is the part placement for the same unit but assembled on the LNA4HF PCB that can be ordered following this link: LNA4HF

I assemble mine on the LNA4HF PCB as this was handy and offer a lot of possibility and extra option, as installing the voltage regulator or extra filter, but this will not be explained now. All the parts are SMD 0805 size except the middle parallel 1nF+100pf capacitors. They are 1206 size just because the gap for the MMIC which should be in place is to big to accommodate the 0805 size. This two capacitors are mounted one top the other. The green parts are simple 0ohm bridges, also 0805 size or just a piece of wire. You can design your own PCB where this green bridges will be replaced with the PCB trace, so even simpler. The PCB can be cut with the X-acto knife like the one on the following picture.


This one is made on the Teflon substrate and with the 0603 size components to reach the 6GHz. You can do the same with the FR-4 laminate but the maximum frequency will be 2GHz. The Laminate should be double sided and the main track should be calculated for the 50ohm impedance. You can use the 1.8uH, 2.2uH, or 3.3uH whatever you find on your cannibalised hard disk drive PCB.

When connecting the Bias-T pay attention on the right orientation of the ports. The DC port is simple, just apply the DC voltage. The RF ports can not be swapped, means that the RF port goes to the DVB-T dongle or receiver where only RF will pass and the DC will be insulated by means of the two parallel capacitors. The RF+DC port should be connected to the coaxial cable going to your remote device (LNA). Of course, this device should have Bias-T option enabled (another Bias-T).

Limitations and performance
This Bias-T is designed to supply the LNAs or other low current consumption devices. The main current limitation is the Bias-T inductor used, so consult the datasheet for the coil you intend to use and note the maximum current.
What about the RF power? You should not have the problems with the LNA or low power up to 500mW. For higher RF power levels the quality ATC capacitors should be used instead.
The losses are well bellow the 1dB over the range from 1MHz to 2GHz as per my quick measurements on the network analyzer. The Bias-T can be used even higher if you need that.

DIY "FM TRAP" or 88-108 MHz Band STOP filter

Among the few "blockers" the most called are the broadcast WFM transmitters. Simple way to solve the problem is to filter the received signals using the "FM TRAP". So called "FM TRAP" is nothing more than a simple Band stop filter for the frequency range of 88-108Mhz. They became really available and so cheap this days that making them at home is more time consuming then money saving. 


But for the guys want to learn how they are designed, and does not want to spend on the shipping filters round the globe here is the receipt and how to guide. On the other hand, if you will need the band stop filter for some frequency other than FM broadcast you will know how to make it at home instead of spending the $$ on the e-bay. Basic idea was simple approach to the problem and solving the same using the freeware software and calculators. The second goal was using the standard components and values that are common and can be found easily. The coils will be wound using the magnet wire and this will reduce the cost of the filter too. At the end, you are free to use any type of the coaxial connector you prefer, so you will not depend only on the standard F-connector.
Let's start. After we decide the range that we want to "block" (88-108 MHz) we need to decide how sharp or step filter we need and the attenuation in the stop band. Yeah, you probably think that there is nothing to decide, we know the FM band (88-108 MHz) If you use this corner frequencies (-3dB) in your design the attenuation of the signal at the beginning and the end of the target range will be low, just 3db, in real life even lower. As we want the uniform attenuation across the whole FM band we need to choose the wider filter range. To make the things simple, I choose the Chebyshev type filter, 3 pole, first element series with the center frequency of 100MHz and bandwidth 55Mhz with the ripple 0.1dB. Of course, the impedance should be 50 ohms or 75 ohms if your system is using 75 ohms for the standard. Setting the mentioned parameters on a free online web filter calculator: http://www.changpuak.ch/electronics/chebyshev_bandstop.php and pressing the calculate the results will appear in the lower window. The required capacitors are 2x 56pF and 1x 20pf. 56pf is the standard value while the 20pf is not. Instead of 20pF you may use the 18pf or 22pf or two parallel 10pF. I used 22pF in my project. 


As we will make the coils using the magnet wire, the values are not critical at all. We can calculate the required inductance based on the wire we have and the former we want to use. I wound mine coils using the 0.35mm dia magnet wire on the drill bit dia 5mm used as a former. Of course, all three coils are air wound. To calculate the required number of turns you can use several on-line calculators. I prefer the following one: http://hamwaves.com/antennas/inductance.html
It is smart idea to check the stop band frequency characteristic and the other performance of calculated filter before taking the soldering iron in hands. Free software that can do that is the RFSim99 that can be found on the web. No installation is required, just running the exe file. Let's draw our filter and simulate it. The result is really good, but only in the perfect world. In the real world the attenuation in the stop band will not be so deep but the curve can give us idea how wide the filter will be and the center frequency. We can tweak the capacitor/inductance values to tune the response of the filter, but calculated values will give us the best results. 

Once we are good with the design we can build the filter. I used double sided FR-4 laminate 1.6mm thick but the others are good too. The PCB is just 1cmx3cm and the traces were cut using the exacto knife. Instead of the SMD type capacitor, the standard lumped parts may be used hence the bigger size PCB and complete filter. The filter can be even made without PCB, all parts soldered in the air style inside the metal container and coaxial connectors. If you stick to the calculated values the filter should be very close to the design and no tuning should be required. If you have the possibility to measure the filter on some network analyzer then you can tweak the filter to the required response as I did. 


I stretch the center coil (5 turns) a bit to obtain uniform attenuation across the required range (at least 30dB) rather than having on some frequencies attenuation of 50dB and a bit lower not more than 25dB. Obtained result can be seen on the following photo. The -3dB stop band range is from 79.5Mhz to 123.3MHz. The -10dB stop band range is from 85MHz to 119MHz. The attenuation on the required range 88MHz-108MHz is 30dB or better with the maximum attenuation of -44.6dB at 103.4MHz. 


If you compare this results with the design done in the RFSim99 simulator the figures are lower but the shape of the filter is the same. This is to be expected due to simple simulation paradigm used and no electromagnetic simulation. More accurate predictions and calculations are possible using very expensive software and this is not the scope of this post. To recapitulate done, we designed the 3 pole stop band filter with the attenuation of 30dB plus in the range of 88-108MHz. The attenuation outside the designed range is really low, where the insertion losses up to 1.7Ghz are bellow 1dB and flat response over the range as can be seen from the lower picture.


What you need to design this "FM trap"? You need:

2x 56pF capacitors (SMD 0805)
1x 22pF capacitor (SMD 0805)
2x 45nH inductance (2.5 turns, 0.35mm wire inner dia 5mm)
1x 126nH inductance (5 turns, 0.35mm wire inner dia 5mm)

Additionally, if you want to have a neat unit then 2 coaxial type connectors, prefer the female SMA type or the combination of the female and male connectors. You can save on connectors if the coaxial cable (preferred Teflon type) is soldered directly to the filter input/output with the braid to the ground shield. The shield/metal box is important. You want to shield the filter properly not allowing the FM signal to penetrate the system using the air wound coil as antenna. If the signals are really strong that can degrade the quality of your design. On the other side, the dongles should be shielded too as the radio signals are passing through the plastic housing without significant attenuation. i made my shield using the empty motor oil can. the shielding is tailored using the simple scissors. Watch your fingers :-)


Designing filters using the lumped elements can work up to 500Mhz. Anything above that will be difficult to create using the lumped elements where instead the micro-strip line technology or some other approach should be used. Good luck and have fun with building the filters.

Wednesday, December 9, 2015

DIY Low-pass 200 MHz filter

Every while I am receiving requests for some custom filter design. Time permit I apply to the call and sometimes this projects are simple and fun to build. This is one can be handy and simple to build using lumped elements with the standard off the shelf values. There was a request for the 200 MHz Low-pass filter, so here it is, maybe somebody else may find it useful in his project.


This is standard Low-pass Chebyshev 5 pole filter. The values are chosen to meet the standard capacitor values 18pF and 33pF. This should be easy to find. The coils are wire wound (home-brew) 65nH. I used the speaker wire 0.4mm dia. where 6 turns on the 3mm drill bit will bring us  pretty close to 65nH. Quick simulation gave us the wanted result with the corner frequency of 200Mhz (-3dB). Simulated attenuation at 400 MHz should be -39.2dB and -57.8 at 600MHz.


As I have some extra spare boards left from my ADS-B and L-band filters i decide to use them for this project. The boards are made of FR-4 1.2mm. They are SMA connector ready so just the coils and capacitors should be added. Extra parts mounted are Bias-T parts so the filter can be used also to power remote LNA through the coaxial line. Above simulation is done without Bias-T circuitry.


Filter from the picture was measured and the results are very close to the simulation. Small difference at the lower frequency is due to Bias-T creating a notch filter. When the Bias-T circuitry was simulated too, the S21 and S11 were quite close to real figures. 


Corner frequency was shifted to 184MHz and this can be tuned to 200MHz simply by stretching a bit both coils. I was quite happy with the results where attenuation on 400MHz is 40dB and 54db at 600MHz. This filter can protect the receiver from the strong broadcast TV stations, GSM cell tower signals but also from the quite spread telemetry on 420-470MHz band. Quick test of the filter can be seen on the following video.


Monday, December 7, 2015

DIY DC block

I am receiving a lot of questions regarding the LNA4ALL usage. More options - more questions. More than year back we introduce the LNA4ALL with Bias-T 5V modification included. This way we can use the RTL.SDR dongle, Hack-RF, Airspy DC power to power remotely LNA4ALL through the coaxial line. Any other receiver that has 3.3-5V DC present on the antenna input connector can power the LNA4ALL using the same principle. Nice option saving some external power supply and extra wiring. And now we come to "but I want to..." section

1. I want to use the antenna that has shorted (DC short) 50 ohms connection !
If you have the AirSpy or HackRF or any other receiver that can switch off Bias-T through the software than this is not a real problem. Even then, if you forget to uncheck the Bias-T option the receiver can survive if any kind of hardware protection is engaged, like poly-fuse.

If you have the RTL.SDR dongle you have to disconnect the Bias-T supply by de-soldering the bridge on the hardware.

2. I want to use the external power supply for the LNA4ALL !
If you have the AirSpy or HackRF or any other receiver that can switch off Bias-T through the software than this is not a real problem.
If you have the RTL.SDR dongle you have to disconnect the Bias-T supply by de-soldering the bridge on the hardware.
The story does not end here. If you side power the LNA4ALL with Bias-T modification the DC will reach the receiver through the coaxial cable, same as RF signal. You have to undo the Bias-T modification on the LNA4ALL and this is not easy for all users. later if you need that option again, you will need to restore all SMD parts back.

Resolving the problems

The problem can be solved by introducing the RF DC coaxial block like the one from the picture bellow. The Minicircuits DC-BLOCK is rated for the frequencies from DC to 18GHz. Of course, quality comes with a price.


As named, DC block is blocking the DC component and letting through the RF component of the signal. This way the radio signal will pass through, to the receiver while the DC voltage from the LNA4ALL will not reach the receiver. This DC voltage may damage the receiver if there is no protection involved.

So what is the magic inside the DC-block? To block a DC we need a capacitor in series with the center conductor. So simple. The only problem is that the capacitor should not cause any losses in the declared range of operation. Basically, the SRF should be high enough, higher than the maximum frequency used. We can achieve that by using a small (size and value) capacitor. Such a capacitor may still introduce significant losses on lower frequencies. If you need good performance, then you will buy rather then build it.

The cheap DVB-T dongles aka SDR receivers we are using are covering the range from 25-1700 MHz. This should not be a big problem for a simple SMD capacitor used as DC BLOCK so we can build one really cheap. The one I build is can be used from 50-3000 MHz without problems.


This is simple DIY project where you will need two SMA (male/female) connectors, a piece of PCB laminate and a capacitor.

SMA connectors
You can use the type of connectors you have or handy for connection to your present equipment but SMA became a kind of standard for the mainly used cheap SDR equipment. Male or female type? Up to you but having one male and another female will cut the need for an extra jumper cable.

PCB laminate
As we are using the frequencies from 50-3000 MHz the losses introduced by the short length of 50 ohm track will not dominate so FR-4/G10 or Teflon type can be used. I re used some surplus RF PCB and cut out a peace with a 50 ohm track. Important! Double side laminate with ground bottom layer must be used.
Just cut the notch on the 50 ohm track where the series capacitor will be soldered.


Capacitor
To make a long story short, just use the SMD 100pF 0603 size C0G capacitor.
If you have a better quality capacitor then use it.
100pF capacitor will give us working range from 50 MHz up to 3000 Mhz for sure. Note that 100pF capacitor will not work on the HF. For that you need to use at least 1000pF capacitor value.
If you have a network analyzer, you can find out the SRF of the capacitor and measure the S1,2 and S1,1 to get the working frequency range. The DC voltage you can block will be limited with the maximum DC rated capacitor value. Standard 50V SMD capacitors are more than good for 5V or 12V DC that are commonly used.

Assembling the DC BLOCK
Cut the PCB to suit your RF connectors. 
Notch the 50 ohm line and solder the 100pF SMD capacitor.
Solder the SMA connectors center pins to the 50 ohm track.
Solder the SMA connectors ground to the bottom PCB ground and top if any.

Performance
Using the mentioned 100pF 0603 SMD capacitor one can get the following frequency response. S1,2 or insertion losses. As mentioned, the losses are high bellow the 50MHz but low up to 3GHz. Observe the markers indicating the losses on 50, 1000, 2000 and 3000MHz. response is pretty flat.


Beside the insertion losses the return loss is also very important. Note the S1,1 through the same range and markers on the same frequencies. Quite satisfying for the amateur use.15dB or better RL through the most of the frequencies will not cause any problems on reception or transmitting through the DC BLOCK.


Yes, you can transmit also through the DC block. The power that is common in the most popular sdr devices is not higher then 10dBm. 50V 0603 size SMD capacitor can handle that without any problems.
Do not stay without your DC block, it may save your receiver, spectrum analyzer or even a signal generator.